 Mobile
 Tower
Tower
 R24
R24
 Builder
 Manager
 Connect
 Kyno
Kyno
 Media Engine
 Remote Access
 Support
BLOG
Post-Production Editing from Cut to Publish
April 29, 2020 |
April 29, 2020 |

Once filming is wrapped, the final video is rarely close to a viewer-ready reel. During the post-production process, the best available footage needs to be selected and shaped into an engaging, unique, and high-quality piece of content. By getting more familiar with what goes into post-production, you will be more comfortable with the process when you are planning your video content schedule.
Post-production is the process that happens after production (Thanks, Captain Obvious!). This is the last stage of creating a video before it is ready to be distributed. Pre-production is the process in which the plan for the execution of a piece of video content is mapped out. The production phase is the actual staging and recording of the video footage, and in post-production the different pieces are put together in order to make a complete video production. Now that that’s out of the way, let’s dive in a little deeper into what goes into a full post-production workflow.
Most cameras record footage onto a connected storage device, like a specialized camera card, an SD card, or a portable SSD drive. It is important that the footage is downloaded to a storage device (such as an external hard drive or a shared storage solution) where a video editor (or video team) can edit off of. The same goes for any audio files recorded on set. It is strongly recommended that the video and audio files should also be backed up to another storage device that is only specifically used for storage and is kept in a safe place in case of emergency.
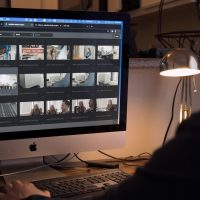
When the editor is ready to start working, they will open their editing program of choice (for example Final Cut Pro X or Adobe Premiere Pro) and will import the media to their editing project. The media should be organized based on specific criteria in order to make it searchable once the video editing process starts. After the media is imported, the video files need to be synchronized with the audio files. Usually, in a traditional feature film post-production workflow, this synchronization is done by an assistant editor. For short-form video creation, or video content marketing teams, this is usually handled by one of the video editors. This is where a media asset management tool could help to make your team’s life a little easier.
Once all the footage is imported and organized, the video editor puts together the rough cut, which is like a first draft of the video by using the script, storyboard, and/or provided guidelines from the director/producer to accomplish that. This is a great opportunity for an editor to use their creativity and sense of timing to make the piece engaging. They may add temporary music or sound effects, too!
After the editor is done with the rough cut, the video is sent out for review and notes. Usually, notes are provided by the stakeholders - director, producer, marketing director, or even high-level management. The editor applies the notes, and if something isn’t possible to achieve, they communicate the reason for that with the stakeholders. Sometimes a stakeholder will have unrealistic expectations for what can be achieved in post-production, which provides the editor with an opportunity to educate the rest of the team (“Just fix it in post”, am I right?!). At Lumaforge, we really like using tools like Frame.io and Iconik when we tackle this review and approval process in-house. This cuts down a ton of the back and forth and allows us to view comments directly from the editing software of choice. If you find these tools are helpful, you might want to check out our workflow page to learn more about other editing tools that could help speed up your post-production workflow.
Always keep in mind that while the post-production team has all kinds of tricks up their sleeves, sometimes it’s impossible to recover from mistakes made on set with both picture and audio.
Once the final round of notes has been implemented, the edit is considered picture-locked and can continue moving through the post-production pipeline.
In most videos, there is a need for some sort of graphical element or animation. You might have your editor work in tandem with someone from your graphic design team to create an attractive title of the video or the company logo, thumbnails for youtube, or even lower thirds (the titles that show the name of the person that is being interviewed).
These assets should be created by the graphic designer, or if this isn’t an option, by the editor themself. It is not a realistic expectation to have a video editor create graphics at the same level as a professional graphic designer, however, some people can luckily be multi-talented (pffft - overachievers).
If there is some dialogue in the video (for example, scripted or interview), it’s critical that an audio editor makes sure that the voice is clear and that there are no distracting noises in the background. Sometimes, video editors have the ability to do basic audio editing, as well. Audio design is when the video requires sound effects to be created and applied. The audio mix is when all of the audio elements - dialogue, effects, music - are brought together into a final mix. The goal with the audio mix is for all the elements of audio to work together, and for no single element to overpower the other audio elements. Oftentimes, the power of audio is underestimated in the production and post-production process. However, it is just as important as the picture. The quality of the audio can be the difference between your video feeling professional or “looking” amateur.
Color correction is used to adjust the picture parameters (exposure, contrast, saturation, etc.) to match the natural look of the scene, for example, to match the skin tone that is in the picture with the actual skin tone of the person who was filmed. Color grading is more of a creative approach and is used to create the desired look and feel for the video piece. Much like audio, color correction should not be underestimated as it will give your video a more polished and refined look. This is usually what people are referring to when they say…”make it pop.”
Once the picture has been edited,colored, and the audio mix is complete, the video is ready for distribution. The video editor creates a final export of the piece based on the parameters given to them. These parameters are usually based on the requirements of the platforms where the video will be posted to. If there are different channels for distribution, there may be a need for multiple final exports (e.g. one for Instagram vs. one for YouTube). Here are some parameters that you should look out for when noting these requirements:
Post-production is not a simple process. The more people on the team are familiar with all that it takes, the easier it will become to plan accordingly. It is always best to include the post-production team in discussions during pre-production as they may have valuable technical input to help speed up the process and make the best out of the production process.
It’s clear here that collaboration is key to keeping this process efficient. Whether the film needs to make its way to multiple team members (editing to audio to color, etc) or even to multiple editors (one cut for social media, one cut for TV, etc.), shared storage can often be the deciding factor that determines whether a team will meet their deadline or not. You can click here to learn more about our Jellyfish solution and how it helps teams to be as efficient as possible during the post-production process.
Happy Editing!

January 14, 2021
December 15, 2020

December 15, 2020

December 10, 2020

October 27, 2020
October 19, 2020

October 13, 2020

October 7, 2020

September 29, 2020